OpenGameAnalytics
A simplified method for collecting user data in serious games experiments.
What is OpenGameAnalytics
OpenGameAnalytics is an open-source tool built for video game researchers to keep track of data on player behavior.
It consists of a Flask server back-end connected to a MySQL database and Unity client package. The Flask server hosts a fully REST-ful API, so one could easily develop a new client package to access the API from another game engine or software.
In order to use OpenGameAnalytics, you must host the Flask server and SQL database yourself and simply add the client package to your game. Please refer to the Quick Start Guide below.
What data is OpenGameAnalytics built to support?
Our database is constructed specifically to serve the needs of serious games researchers, but these needs could be expanded with small modifications.
The application is built to collect:
- Users identified by randomly generated tokens per device
- Session data regarding the start, end, and duration of a player’s play session
- Player actions during a play session
- Conditions assigned to the player for the purposes of experimentation (i.e. independent variables)
- Data capturing study endpoints (i.e. dependent variables)
- Information about the player that we don’t expect to change during play (i.e. demographics)
You can find the structure of this database in the API documentation.
Quick Start Guide
To get started, you need to get the Flask server running and set a client up to connect to it.
Running the Flask Server
The flask server primarily runs off of app.py. You will have to adjust some configuration options in config.py.
For the Flask server to run properly, you’ll need your database hosted somewhere. I run my own deployment of OpenGameAnalytics with a MySQL server but in theory you can use any SQL-style relational database with some modification. By default, as you can see in config.py, the application will connect to the SQLite database at test.db. See the source code below that begins around line 20:
# app.config['SQLALCHEMY_DATABASE_URI'] = "mysql+mysqlconnector://{username}:{password}@{hostname}/{databasename}".format(
# 	username="XXXXXXXXXXXXXXXX",
# 	password="XXXXXXXXXXXXX",
# 	hostname="XXXXXXXXXXXXXXX",
# 	databasename="XXXXXXXXXXX",
# )

app.config['SQLALCHEMY_DATABASE_URI'] = "sqlite:///data/test.db"
For testing purposes, go ahead and try the following steps with the code unchanged! The code will run fine with the SQLite database connection but this is not recommended if you expect a large number of users.
To connect to your own MySQL server, simply modify the commented-out database credentials per your database and remove the SQLite line. The schema for the database is found in data/schema.sql.
There is one other line you will definitely need to edit! See this from config.py:
game_dictionary = {959742: "Example Game"}
This game dictionary details the games this instance of OpenGameAnalytics will keep track of. This allows you to use one instance of the server to collect data for a whole bunch of games! The keys in this dictionary are referred to elsewhere as GAME_ID for the given game and the values are the names of the games. So, this dictionary defines that this instance of the server will support one game, named “Example Game” with GAME_ID of 959742. Modify this line to instead track your own game (or games) – the GAME_ID should be a 6-digit integer.
Running Flask Locally
To run the Flask server locally (which you should totally do to test your game), jump into a terminal and cd over to the project directory. Assuming you have the Python packages listed in requirements.txt installed (I’d recommend doing that in a Virtual Environment!), you can run the server with the following two lines:
export FLASK_APP=app.py
flask run
Note: If you’re on Windows, you need to use set instead of export.
Deploying Flask
If you want deploy the Flask server so you can use it in the wild, there are a number of services you can use to easily get up-and-running. Here are some options:
- The easiest is probably Python Anywhere, which also gives you a MySQL database for pretty cheap.
- Here are a bunch of deployment options from Flask itself
Connecting a Unity Client
Import the Unity Package
You can download the most recent build of the Unity Package here. Simply drag the package file into your Unity client to import it into your project.
Configure the Client
Most of OpenGameAnalytics in Unity is based around a single game object. After you’ve imported the package, go to the prefabs subfolder and drag the OpenGameAnalytics prefab into the first scene of your game. This object will sustain itself as other scenes load and cannot be a child of another object in the scene.
This object will handle most of your data collection automatically (at least data around play session times and durations) but you first must set a few parameters, which you can modify from the inspector:
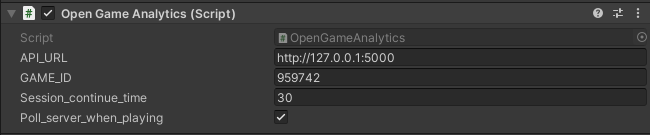
These are the four parameters:
- API_URL: The url of wherever you’ve hosted the Flask server. The default value is for a local server
GAME_ID: This is theGAME_IDspecific to this game, described above. Should be a 6-digit integer.- session_continue_time: By default, the client will poll the server to create session_continue objects indicating the player currently has the game open. This float indicates the number of seconds between these POSTs.
- poll_server_when_playing: A boolean indicating whether the session_continue polling will occur at all.
Modifying your game’s code to collect extra data
Outside of simple session data (i.e. when a given player is playing), OpenGameAnalytics gives you four methods for saving data. These methods are:
- SaveUserInfo(string attributeName, string info): This saves a piece of information about this user that we do not expect to change over the course of play, such as demographic information
- SaveUserAction(string action_name, string info): This is some action the player has performed while playing the game.
- AssignCondition(string conditionType, string info): This is saving that an experimental condition has been assigned to this player, i.e. the independent variable.
- SaveStudyEndpoint(string attributeName, string info): This is capturing a piece of data relevant to a study endpoint, i.e. the dependent variable.
// Saves this user's age as 32
OpenGameAnalytics.instance.SaveUserInfo("age", "32");

// Saves that this user's study ID is 00012
OpenGameAnalytics.instance.SaveUserInfo("study_id", "00012");

// Saves that the user choose option #4 during choice #2
OpenGameAnalytics.instance.SaveUserAction("choice2", "4");

// Saves that the user was randomly assigned to the 1st person condition
OpenGameAnalytics.instance.AssignCondition("perspective", "1st-person");

// Saves that the user chose answer 'A' for the first question of some quiz
OpenGameAnalytics.instance.SaveStudyEndpoint("QuizQuestion1", "A");
// ^^^ Would only use this if there's something in the game itself to measure an endpoint
// i.e. something we may expect to be changed by the game
You can place code like this in any of your scripts and it will call the OpenGameAnalytics object to save the data.